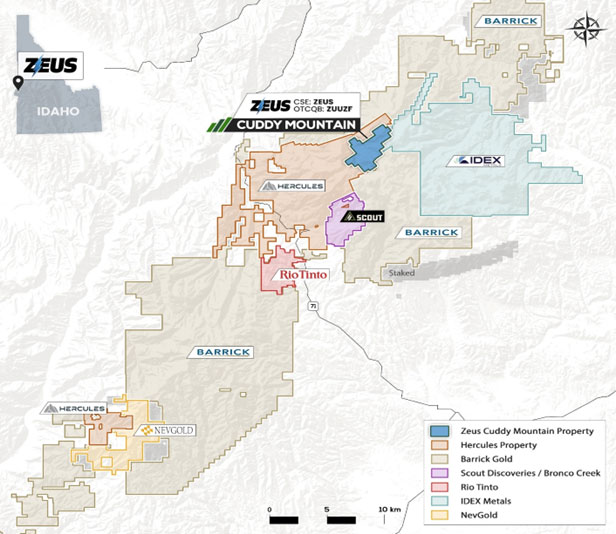
ZEUS – DISTRICT SCALE STAKING RUSH
Flagship Cuddy Mountain Property is adjacent to Hercules Silver (BIG:TSXv) newly discovered Leviathan Copper Porphyry ($188M MC).*
The discovery resulted in Barrick injecting $23M in equity.
1000’s of new claims have been staked demonstrating the potential district scale understanding of the discovery.
The Cuddy Mountain Property consists of 101 lode mining claims respectively and cover a cumulative area of approximately 2020 acres.
The Property is in Washington County, Idaho just 2.5 hours Northwest of Boise and is road accessible.
*Adjacent Property (www.herculesmetals.com). Zeus’s management cautions that past results or discoveries on properties in proximity to Zeus may not necessarily be indicative of the presence of mineralization on the Company’s properties.
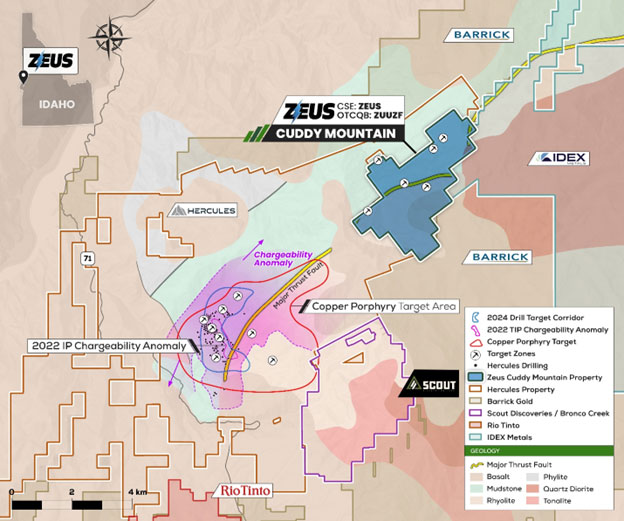
ZEUS – CUDDY MOUNTAIN GEOLOGY
The Cuddy Mountain Property is adjacent to Hercules Silver’s newly discovered Copper Porphyry.*
Using modern systematic exploration, Hercules has located the Leviathan Porphyry in the adjacent andesitic volcanic rocks (Seven Devils Volcanics) underlying the Hercules Rhyolite.
Shallow level porphyry style alteration has been mapped using copper-in-soil anomalies in and around historically defined silver mineralization.
*Adjacent Property (www.herculesmetals.com). Zeus’s management cautions that past results or discoveries on properties in proximity to Zeus may not necessarily be indicative of the presence of mineralization on the Company’s properties.
ZEUS – 2024 EXPLORATION
- Property Wide Soil Samples (799 Soils)
- Property wide Ground Magnetics-105 Line Km’s
- Property wide mapping and rock grab sampling (339 Rock Grab Samples)
- Staking
- Property wide 3D-IP and Resistivity Survey
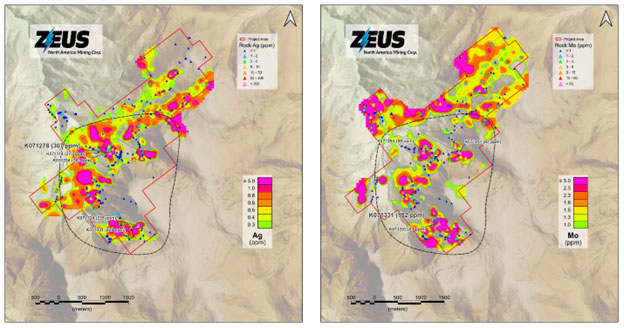
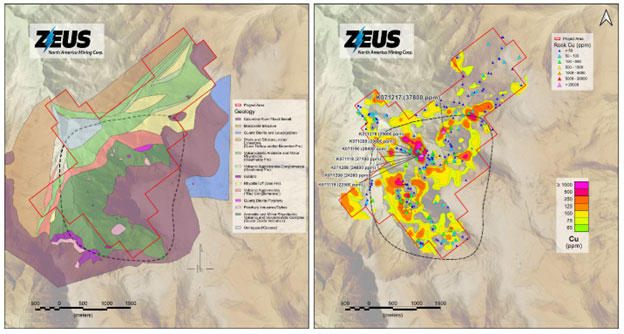
ZEUS – 2024 EXPLORATION RESULTS
- Soils delineate a broad 3 km by 3 km copper and molybdenum in soil circular anomaly underlain by the Seven Devils Volcanics (~741 acres).
- Cu-Mo anomaly is strongest over the mapped volcanic rocks (andesites and rhyodacites) near the valley floor - interpreted to be sub-cropping exposure of the Seven Devils Volcanics, which host the neighbouring Leviathan Porphyry Copper discovery.
- The newly identified copper-molybdenum soil anomaly contains individual soil samples up to 0.38 percent (“%”) copper and 28.5 parts per million (“ppm”) molybdenum (31 samples contain 212 ppm Cu or more; 5 samples contain percent level copper up to and including 0.38% Cu; 116 samples contain 2 ppm Mo or more; 6 samples contain more than 10 ppm Mo, with values up to and including 28.5 ppm Mo).
- Cuddy Mountain continues to show strong similarities to the Hercules discovery, with a comparable soil geochemical footprint.
- Of the 339 rock grab samples collected:
- 35 samples contain 0.1% Cu or more; 16 samples contain greater than 1.1 % Cu copper, up to and including 3.8% Cu;
- 29 samples contain 10 g/t Ag or more; 9 samples contain more than 129 g/t Ag, with values up to and including 307 g/t Ag;
- 26 samples contain 10 g/t Mo or more; 5 samples contain more than 40 g/t Mo, with values up to and including 182 g/t Mo (with 0.37g/t Au).
ZEUS – CUDDY MOUNTAIN HISTORIC WORK*
- Lead Zone Mine: Historical small-scale Silver/Lead mine averaging 3.5 oz/t silver from 1950-52.
- 7 shallow drill holes in 1977 intersected anomalous lead and silver. Drill hole Mun 8 contained 90 feet of 2.02 oz/t Ag (Taylor, 1977).
- Edna May Mine: Mineralized vein with chip samples containing 750 ppm ppm Pb, 7.7% Zn and 252 ppm Ag over 4 feet.
- Underground drilling in 1979 intersected 1.38 oz/t Ag over 7 feet in a breccia zone (Burmeister, 1980).
- Rockslide area: Malachite-stained outcrops with a grab sample containing 760 ppm Pb, 0.67 % Zn and 36 ppm Ag (Taylor, 1977).
*All information is derived solely from management of Zeus Mining and otherwise publicly available third-party information which are believed to be reliable, but which have not been independently verified by the Company and as a result are not guaranteed as to accuracy and completeness.